Pages

Sunday, March 6, 2016

Growing Peppermint in North Texas


Peppermint for Every Herb Garden

Of all of the plants in our garden, peppermint is one of the easiest to grow.  It seems happy with the simple life we have provided for it.  I realize that just because something grows well, it doesn't necessarily  mean that you want it in your garden, but mint is one of those things most people do want.  It attracts beneficial insects like bees with it's lovely flowers and deters some other less wanted ones - namely ants.   I know people who have trouble growing mint in our neck of the woods, but I find that with a little shade, mint will thrive.  The mint at our place gets morning shade and afternoon sun.  It will flourish in the spring and autumn when the temperatures are mild and hang in there during the summer and winter months.  With just a little planning, you can have fresh mint all year long!

In the prairie regions of Texas, peppermint appreciates dappled sun or partial shade.


Propagate Your Own Peppermint

Did you know that mint is one of the easiest plants to propagate?  Just take cuttings and stick them in water.  Be patient and change the water out every few days and in a week or two, your cuttings will have roots.  In the meantime, the mint cutting make a lovely addition to the kitchen and puts a fresh, spring smell in the air.  I have even direct sewed mint cuttings into a water retaining medium such as vermiculite and had it do just fine.  Nurse it along for a little while, making sure to keep the growing medium moist, and in a few months you will have more mint to plant outside, or keep inside in a pot for an attractive addition to the kitchen herb garden.


How to Use Peppermint:  Food and Medicine

Many people love to put fresh mint in their tea or just chew on it for the robust flavor.  You can add it to chocolate cookies or brownies for a refreshing taste surprise.  Mint is great in salads and as an herb used in cooking.  Here is a link to a few recipe ideas to get you started:

http://localfoods.about.com/od/mint/

Did you know that mint also has some nice medicinal properties?  It can give your body a boost when you're fighting a cold and help settle an irritated stomach.  Follow the links below to learn how to use mint in ways other than just in your tea.

http://www.health.com/health/gallery/0,,20307175,00.html

http://www.motherearthliving.com/healthy-home/natural-cleaning/15-uses-for-mint-zmhz13mazmel.aspx?PageId=2#ArticleContent


Happy gardening!

Saturday, March 5, 2016

Every Garden Needs Bees


Gardens need bees and bees love flowers.  Sounds like a match made in heaven, right?  In the past, this may have been true, but for the past ten years, bee populations in the United States and Europe have declined by roughly 30%.  Although not everyone agrees on the reason this is happening, everyone does agree that this is very alarming and could lead to big trouble for farmers who depend on these small insects to pollinate their crops. 

Some people believe pesticides are the problem and some countries are placing bans on the most likely culprits.  Neonicitinoids are one of the main classes of pesticide believed to be negatively affecting bee populations and these are, unfortunately, one of the most widely used.

This is just one more reason to consider organic gardening.  Without our bee friends, we're going to be in trouble!  What else can we do to encourage healthy bee colonies?  Plant flowers that bees love!  Here is a link to some of their favorites:

http://www.birdsandblooms.com/gardening/garden-bugs/top-10-flowers-that-attract-bees/

Beside filling your yard and garden with beautiful, fragrant, bee attracting flowers, also be aware of the type of habitats that they look for.  If you have something like this on your property, consider leaving it there.  If you notice that a colony of bees has taken up residence on your property and you don't want it there, instead of killing it off, call a local beekeeper to see if they will move it for you.  Here is some information on habitats and nests:

http://bumblebeeconservation.org/about-bees/habitats/bumblebee-nests

Together, we can keep these great pollinators, in our area and around the country, thriving!

Wednesday, August 27, 2014

Raised Bed Gardening Infographic

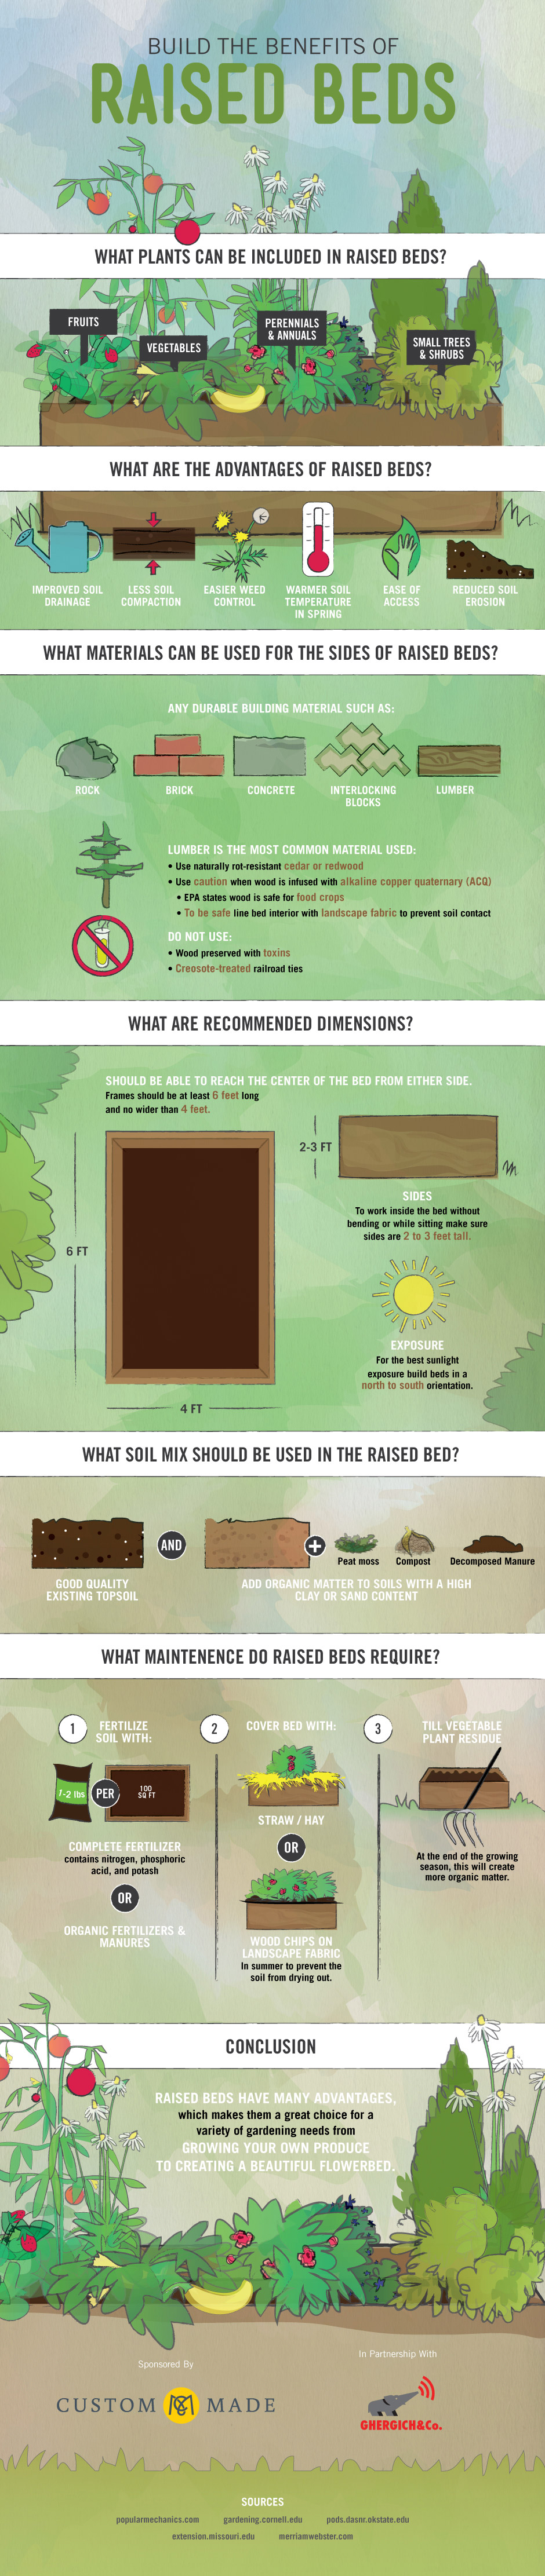
Look at this great infographic on raised beds!  It includes information on ideal bed sizes and soil mixtures.  While I loved my double dug beds, and have plans to build a hugelkultur mound in the future, transitioning to raised beds for most of my garden has really streamlined the soil building process.  The black clay that my soil is made up of is extremely rich in minerals, but an absolute bear to work with.  It's notorious for compacting back down.  Every year saw me tilling it back up.  The benefits of the double digging didn't last beyond 2 seasons.  Making the switch to raised beds has made it a lot easier to create healthy, humus rich soil that doesn't need to be plowed up every year.


Click to Enlarge Image

Build The Benefits of Raised Beds

Build The Benefits of Raised Beds
Infographic by CustomMade

Sunday, August 3, 2014

Garden Goings On

Now that the black gumbo has firmed up bit, we're in the garden running damage control (picking cracked tomatoes and such).  We're also spraying neem oil, fertilizing with fish emulsion, harvesting what's ripe, and scouting for a good location for the rabbit hutch.

Thursday, July 10, 2014

Seasonal - Watering Trees in Summer

Watering my trees. This is a baby fig tree. When the weather gets relentless in Texoma, you've got to get a little creative about water. A small hole drilled into the bottom of a 5 gallon bucket ensures that each tree gets plenty of water. The hole is small for a slow release. I give my trees 10 gallons of water each week in this way.  The bricks are there so that husband and son don't mow them over (again).

Friday, June 6, 2014

Peach Picking - Jenkins Farm

We had a great time yesterday picking peaches at Jenkins Farm in Ravenna.  Due to our crazy winter, peach season is short this year, and farmer Claude Jenkins doesn't expect it to last much beyond this week.  Call first, and then hurry over there if you want peaches.  Blackberries will come later, and corn after that.  He has such a great operation over there.  Lots to take note of if you're a gardener or mini-farmer.

Monday, June 2, 2014

Herb Season

We are deep into herb season in Texoma! Here pictured is rosemary, orange mint, parsley, and cilantro. Cilantro and basil are probably going to seed on you.  Parsley older than one year is too. In my experience only parsley loses flavor when it seeds, and that's just the stalks that are actually flowering, so don't be shy to keep clipping and eating your fresh herbs!

Sunday, May 18, 2014

Quick Word on Roses

Roses love Texas. These are a mini rose called Happy Chappy. They are prolific blossomers. I don't fertilize them much, though I do spread new mulch around every couple of years (as it breaks down).  I also give them a biweekly Epsom spray and dead prune them through the growing season.  If they need a harder cutting back, I usually wait until late winter.  Grasshoppers have eaten my roses to bits, so I'm experimenting with neem oil this year to see if that helps.

Monday, July 29, 2013

Stuffed Eggplant – A New Summertime Favorite


 Let me start off this post by saying that this is Jennifer’s recipe.  I can take no credit for it.  As a matter of fact, the eggplant as well as all of the other vegetables used in this recipe came from Jennifer’s garden.    She brought it all over to the house one day to try to teach me something new.  That being said, here’s what I learned:  Stuffed eggplant tastes great!

Here is the recipe we used:

2 small eggplants
1 cup rough cut bread crumbs or plain croutons
1 small onion
1 small zucchini or yellow squash
2 cloves of garlic, minced
1 small bell pepper
1/2 cup mushrooms of your choosing
1/2 cup browned sausage
1 cup of grated cheese (you can pick your favorite kind, we used mozzarella).
Optional:  4 cherry or grape tomatoes, halved or whole
salt
black pepper
crushed red pepper (optional; to taste)
basil (to taste)
oregano (to taste)
extra virgin olive oil or butter (your choice)
Vegetarian option:  Skip the meat and up the mushroom portion to a cup.  You can also substitute the meat with a 1/2 cup of any vegetable that you wish.  Peas come to mind as a nice addition.

Cut the eggplants in half from stem to bottom (lengthwise) and scoop out the insides.  Leave about ¼” of eggplant left inside the skin all the way around.  Dice up the eggplant innards, spread in a colander bowl, and sprinkle lightly but evenly with sea salt.  Leave them to sit for a half hour.  Preheat the oven to 350°.  Dice up the onion, zucchini, pepper, and mushrooms. Mince the garlic or use a garlic press.  Combine them and sauté them with the diced eggplant in extra virgin olive oil or butter.  Season as you wish.  We used salt, pepper, a dash of basil, oregano, and some red pepper seeds.  When everything is tender, add the tomatoes and sausage if you choose to do so.  We added both for a little extra flavor and staying power.  The sausage we had on hand was a medium spiced variety, so it added just a little extra zip to the final meal.  When everything is mixed, stuff those hollowed out eggplants as high as you can get them with the meat and veggie combo.  (Try as we might, we just couldn’t get all of the good stuff back into there.  I saved it for a quick dish some other night).  Arrange filled eggplant halves in a baking dish and roast at 350° for about 20 minutes.  Remove from the oven, top with cheese, and return to the oven until cheese is melted and a bit browned, about 10 minutes.  Serve up and enjoy!

I know that I identified the tomatoes and the sausage as optional, but really anything in that list of vegetables (other than the eggplant, of course) is optional.  You can also add in your favorite veggie if it’s not in this list.   I do believe Jennifer said she uses whatever she has on hand.

So there you have it – if you have a plethora of eggplant and you just don’t know what to do with them, stuff them for a quick, delicious, and nutritious meal. 

Thursday, July 25, 2013

The Scientific Gardener: Royal Burgundy Bush Beans

The Scientific Gardener: Royal Burgundy Bush Beans: For years I have been growing beans that do well in Tucson’s hot, often dry, climate. As often happens in Tucson, it is easy to grow veget...

Sunday, July 14, 2013

Simple Blackberry Jam and Syrup


The Texoma Gardening blog has discussed making jams and jellies of various kinds in the past, but I’m going to visit the topic once again today.  We headed out to a pick-your-own blackberry farm this week (Jenkins Farm in Bonham) and came home with a load of beautiful, sweet berries.  We have put a sizable dent in our take just from eating them a handful at a time, but I decided to try my hand at blackberry jam and syrup last night.

With my old tried and true jam recipe at the ready, we went to work.  Unlike many fruits, we used the whole berry here.  The seeds got added to the mix along with everything else.  If you’re going for a smoother jelly, you may want to strain your pulp.  With the whole fruit method used here, we found that three cups of whole berries roughly equaled two cups of mashed up pulp.  Therefore, it took six cups of whole berries and four cups of sugar to get things going.  Because the berry mix was so thick, I lowered the cook time to try to prevent over thickening of the end product.  Here’s what we did:

Take 2 cups of blackberry pulp and add to a large pot.  Stir in two cups of sugar.  Bring to a strong boil and stir often for 8 minutes.  Add another two cups of pulp and another two cups of sugar.  Bring back to a boil and continue stirring. 

At the three minute mark, we filled two half pint jars to be used as syrup.

Continued cooking the remaining mixture for an addition five minutes (8 minutes total after the second two cups of berries and sugar were added).  Pour this into prepared jars for the jam.  Seal the lids and process the jars.  Many people give the filled jars a hot water bath at this point.  I’m not one of those, but that doesn’t mean you have to be like me!  (I find that all that sugar keeps things in fine shape regardless, but the hot water is probably a good idea).

The end result was very lovely syrup, which we tested this morning on our pancakes.  The syrup, along with some fresh blackberries, made for a delicious breakfast.  The jam ended up at a very nice consistency also, and I’m going to call our first foray into blackberry preserves a big success.

Tuesday, July 9, 2013

Help Your Garden Beat the Heat


It seems that the hot, hot summer has finally arrived.  This presents a whole new range of gardening challenges, the foremost of which is how to keep your garden alive and thriving in these hot summer months.  There are a few plants, such as okra and jicama that love these long, sunny days.  Most of the garden is just crying out for mulch, water and shade though.

I was scouring the internet looking for tips on the best way to keep the garden happy and thought I’d share some of the creative things that I found.  As far as watering goes, the quick watering that is fine during the spring just won’t cut it in Texas in July and August.   The plants need a good, long, slow watering that will allow the water to soak into the ground near the roots.  A drip hose will accomplish this, as will a soaker host.  Another creative idea is to save your two liter soda bottles or gallon milk jugs, poke a very small hole in each one and bury it several inches deep in the soil right next to your plants.  If you have a row of plants, space them every few feet.  Two or three times a week, just go out and fill up all the bottles.  The water will slowly leak into the soil near the roots, giving the plant a thorough drink.   Remember to mulch heavily to help prevent evaporation and help hold the water around the plants’ roots longer.  No less than three inches is recommended.

If you have young trees, shrubs or bushes, a great idea is to put a very small hole (I used a drill and made a 3/32” hole) in a five gallon bucket.  Place the bucket near the base of the tree or shrub and fill it up.  It may take up to an hour for the water to slowly leak out – which will almost assure that the roots will be getting the water they need to keep the plant healthy.

Don’t forget one of the most important things when working out in the heat – take care of yourself too!  Make sure that you stay hydrated and shaded from the hot sun.  Try to get out before it gets too hot.  If you find yourself outside working during the hottest part of the day, just take it easy and take lots of breaks.  

As always, stay cool and happy gardening!

Sunday, June 23, 2013

Horse Nettle - A Thorn FIlled Weed in the Texas Tradition


I’ve heard it said that everything in Texas bites, stings, or sticks.  Now we all know that Texas is full of lovely flowers and can be home to many varieties of our favorite vegetables.  That being said however, Horse Nettle lives up to the old Texas folklore.  

Here is a picture of one of the plants in our garden:


I wanted to show the flowers and fruit, but the flowers are a week or two off and they won’t have ripe fruit for a month or two.  Here is a link to some good photos to help you recognize it easier:


Horse Nettle (Solanum carolinense) is found in the eastern part of the U.S. and as far west as West Texas.   Our garden is full of them and they are full of thorns!  The stems and leaves both play host to some nasty, rather large ones (thorns that is).  I won’t go near them without gloves.  The root system boasts a long tap root, making it hard to pull out and, also puts out rhizomes to help spread the plant far and wide.  It is a member of the nightshade family and like a lot of nightshades, it is poisonous.  The root, leaves, flowers and fruit all contain an alkaline that can cause it to be potentially fatal.  Don’t be fooled by the lovely tomato like fruit it bears – it can be dangerous stuff.

That being said, the flowers do attract bees and some moths and a few birds and small rodents are known to eat the fruit.  In the past, it was used by some American Indians as as a sedative and antispasmodic, and although it isn’t considered by most people today to have any value medicinally, there are some herbalists that still use it.  Here is an informative page that claims horse nettle can be used in the treatment of epilepsy, asthma, bronchitis and other convulsive disorders.


I also read an article that claims the leaf can be applied directly to the skin to treat poison ivy.  I would think you’d have to de-thorn it first! 

Medicinal uses or not, for now I do my best to keep the horse nettle out of our garden.   Whether you choose to cultivate it or kill it, be careful!